
How to Clean Your Robot Mower Safely Without Damaging Electronics
Aaron Cooper1. Introduction
A robot mower is supposed to give you your weekends back—not quietly lose performance while you’re not looking. But here’s the catch: every mowing session leaves behind a mix of wet grass, dust, and debris that slowly clogs blades, blinds sensors, and strains motors. Ignore it, and you’ll start seeing uneven cuts, navigation errors, or docking failures.
This guide walks you through exactly how to clean your robot mower safely, step by step, without turning a simple maintenance task into an expensive repair.
2. Safe Step-by-Step Cleaning: Protecting Sensors, Motors, and Electronics
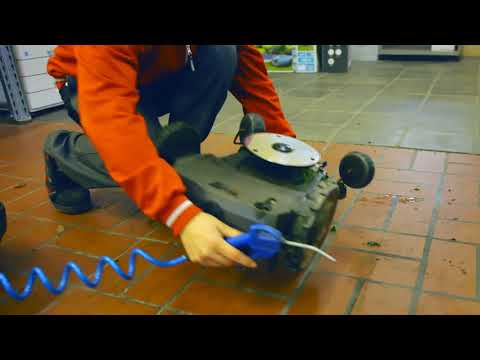
2.1 Preparation First: Power Off, Disconnect, and Stay Safe
Before you even think about brushing off a single blade of grass, stop. This is where most people get careless—and where damage often begins.
Robot mowers are packed with exposed moving parts and sealed electronics. Cleaning while the unit is powered or docked isn’t just risky—it’s how accidental startups and short circuits happen. That’s why every major manufacturer follows the same baseline rule: power everything down completely and isolate it from electricity.
- Power Down: Start by turning off the main power switch—not just pausing the mower.
- Disconnect: Remove it from the charging dock, and unplug the station from the wall.
- Secure Battery: If your model allows battery removal, this adds another layer of safety, especially when working around blades.
- Positioning: Place the mower on a stable, flat surface before flipping it.
It sounds basic, but this prep step is what separates safe maintenance from costly mistakes. Skip it, and you’re gambling with both your fingers and your mower’s internal electronics.
2.2 Dry Cleaning First: Brushes, Cloths, and Air Tools That Won’t Harm Electronics
Here’s the mistake a lot of owners make: they reach for water too soon.
But according to cross-brand guidance, the safest and most effective approach is the opposite—remove as much debris as possible while everything is completely dry. Moisture should always be the last resort, not the starting point.
Why? Because wet grass clippings don’t just rinse away—they turn into a sticky mess that can get pushed deeper into seals, vents, and sensor edges. That’s how water sneaks into places it shouldn’t.
Start with a soft brush—something like a dish brush or detailing brush. This lets you gently sweep away grass from the deck, wheels, and chassis without scratching plastic or damaging seals. For tighter spaces, a handheld vacuum or low-pressure compressed air works well to lift out fine debris without forcing it inward.
For the exterior and sensors, use a microfiber cloth. If needed, it can be slightly damp—but never dripping. Think “barely moist,” not “just rinsed.”
The goal here is simple: remove 80–90% of the mess without introducing any liquid risk. Do that, and everything that follows becomes safer—and easier.
2.3 Cleaning Key Components Without Damage (Deck, Blades, Wheels, Sensors)
Now comes the part everyone rushes—but this is where careful technique really matters.
Flip the mower over securely. You’ll usually find the underside packed with clippings, especially if you’ve been mowing in damp conditions. Start by removing large clumps by hand (with gloves), then move in with a soft brush to clear the cutting deck and blade area.
Be cautious around the blades. Don’t grab or force them—rotate the disc gently if needed to access trapped debris. If buildup is stubborn, resist the urge to scrape aggressively. A light touch protects both the coating and the balance of the cutting system.
- Wheels: Grass wrapped around axles or packed into treads can reduce traction and cause navigation issues. Brush them clean and spin each wheel to ensure smooth movement.
- Sensors: These are the “eyes” of your mower—whether it’s ultrasonic sensors, LiDAR (laser-based mapping, like giving the mower spatial awareness), or cameras.
Even a thin film of dirt can throw off navigation. Use a clean, soft cloth—dry or slightly damp—and wipe gently. No sprays. No pressure.
This is where many navigation problems start—and where a careful wipe can instantly fix them.
2.4 Charging Contacts and Dock: The Most Overlooked Risk Area
If your mower ever docks but doesn’t charge—or keeps retrying awkwardly—this is the first place to look.
Charging contacts are small, exposed, and incredibly sensitive to dirt, oxidation, and moisture. And yet, they’re often ignored during cleaning. That’s a mistake.
Debris or corrosion on these metal plates can interrupt power flow entirely, leading to frustrating “no charging” errors. A quick wipe with a dry cloth is usually enough to restore proper contact. For more stubborn buildup, some manufacturers allow very light use of fine abrasive material—but only on the metal contacts, never around them.
In fact, many guides emphasize that high-pressure water can force moisture into sealed components and damage electronics, which is especially risky around charging systems.
Before cleaning the dock, always unplug it. Then remove grass, leaves, and debris from the base area and entry path. A clean docking zone isn’t just about charging—it helps the mower align correctly every time.
Clean contacts. Dry surfaces. Reliable charging. It’s a small step that prevents one of the most common (and annoying) failures.
4. Water vs No-Water Cleaning: What’s Actually Safe for Your Model?

4.1 Understanding IP Ratings (IPX4–IPX6) Without Misinterpreting Them
“Waterproof” sounds reassuring—until you realize it doesn’t mean what most people think it does.
Robot mowers are often labeled with IP ratings like IPX4, IPX5, or IPX6. These come from standardized lab tests that measure how well a device resists water exposure. But here’s the catch: those tests simulate controlled conditions, not your backyard with a hose in hand.
Real-world designs include seams, charging ports, sensors, and moving parts that aren’t equally protected. That’s why even manufacturers of high-rated models still emphasize caution. A unit rated for rain or occasional splashes can still be damaged by directed water flow into the wrong area.
Think of it like a rain jacket. It keeps you dry in a storm—but aim a hose directly at the zipper, and water gets in fast.
So don’t treat IP ratings as permission. Treat them as limits. Respect them, and your mower stays protected.
4.2 When a Garden Hose Is Safe—and When It’s Not
So… can you actually use a hose?
The honest answer: sometimes—but only if your specific model says you can.
Some robot mowers are explicitly designed for “easy cleaning” and allow a gentle rinse with a garden hose. Others—sometimes even with similar IP ratings—strictly forbid any running water. That’s why relying on specs alone is risky. The manual always wins.
You’ll also notice a consistent warning across manufacturer guidance: even on waterproof models, you should only use a gentle rinse rather than aggressive water cleaning. That single detail makes all the difference.
If your mower falls into the “hose-allowed” category, think of water as a finishing step—not the main event. Dry cleaning does the heavy lifting. The rinse just clears what’s left.
If your manual says no water? Then it’s a hard no. No exceptions.
4.3 Why Pressure Washers and Sprays Are Always a Bad Idea
Let’s clear this up fast: pressure washers and robot mowers do not mix. Ever.
It might feel satisfying to blast away layers of caked-on grass in seconds. But what you don’t see is where that water is going. High-pressure streams don’t just clean surfaces—they force water past seals, into bearings, and straight toward sensitive electronics.
And once water gets inside? It doesn’t just dry out harmlessly. It lingers. It corrodes. It creates intermittent faults that show up days or weeks later—navigation errors, charging failures, even complete system shutdowns.
So if you’re tempted to speed things up with a powerful spray—don’t. A brush takes longer. But it doesn’t destroy your mower.
5. Quick Decision Framework: How to Choose the Safest Cleaning Method

5.1 Classify Your Mower: Dry-Clean Only vs Hose-Capable Models
Not all robot mowers are built the same—and treating them like they are is where most cleaning mistakes happen.
A simple way to stay safe is to classify your mower into one of three categories before you even start:
- Dry-clean only: No hose use allowed. These models rely entirely on brushes, cloths, and air tools.
- Cautious rinse models: Allow limited, low-pressure rinsing—usually on the underside only, and never near sensors or ports.
- Hose-capable models: Specifically designed for gentle hose cleaning, but still with strict limits.
Here’s the surprising part: two mowers with similar “waterproof” ratings can fall into completely different categories. That’s why guessing based on specs alone doesn’t work.
If you’re unsure, default to dry cleaning. It’s slower—but it’s always safe.
5.2 Spot the High-Risk Areas: Sensors, Seams, and Charging Ports
Before you introduce even a drop of water, take a closer look at your mower’s weak points.
These machines may look sealed, but they’re full of hidden entry points. Sensors, seams, charging contacts, and wheel hubs are all potential pathways for moisture to sneak inside.
| Vulnerable Zone | The Risk of Moisture |
|---|---|
| Sensors (LiDAR/Cameras) | Distorted readings, missed turns, failed docking. |
| Seams & Joints | Designed for rain, not direct streams; invites internal water. |
| Charging Contacts | Leads to corrosion; mower fails to charge. |
Once you start seeing your mower as a collection of vulnerable zones—not just a rugged outdoor device—you’ll clean it very differently. And much more safely.
5.3 A 1-Minute Checklist Before You Start Cleaning
Before you grab a brush—or worse, a hose—pause for one minute and run through this.
- Have you checked the manual for water guidance?
- Is your mower classified as dry-only, cautious rinse, or hose-safe?
- Are you dealing with loose debris (dry clean) or stubborn buildup (maybe light moisture)?
- Do you know where the sensitive areas are—and how to avoid them?
This quick mental checklist can save you from the most common (and costly) mistakes.
Because here’s the reality: most damage doesn’t come from neglect. It comes from doing the right thing—the wrong way.
6. Conclusion
Cleaning your robot mower isn’t just about keeping it looking good—it’s about protecting the electronics that make it smart in the first place.
The safest approach is simple: start dry, use moisture sparingly, and always follow your manufacturer’s guidance. IP ratings can help you understand limits, but they’re not permission to grab a hose. And pressure washers? Completely off the table.
Stick to a consistent routine, pay attention to sensitive areas like sensors and charging contacts, and take an extra minute to choose the right cleaning method each time.
Do that, and you’re not just avoiding damage—you’re extending the life of your mower, preserving its performance, and keeping your weekends exactly where they belong: hands-free.
FAQ
Q: Can I use a pressure washer to clean my robot lawn mower?
A: No, you should never use a pressure washer. High-pressure streams can force water past seals and into sensitive electronic components, causing permanent damage and potentially voiding your warranty. Stick to soft brushes and dry cloths for the safest results.
Q: What does an IPX4 rating mean for my mower?
A: An IPX4 rating indicates that the device is splash-resistant from any direction. However, this does not mean it is waterproof. You should still avoid direct high-pressure water streams and never submerge the unit, as seams and sensors remain vulnerable.
Q: How should I clean the sensors on my robot mower?
A: Sensors, including LiDAR and ultrasonic eyes, should be cleaned gently using a soft, dry microfiber cloth. Avoid using cleaning sprays or abrasive materials, as even minor scratches or residue can interfere with the mower's navigation and docking capabilities.
Q: Why is my robot mower not charging after cleaning?
A: This is often caused by moisture or debris on the charging contacts. Ensure the metal plates on both the mower and the dock are completely dry and free of oxidation. Use a dry cloth to wipe them clean to restore a proper electrical connection.
Q: Is it safe to flip my robot mower over for cleaning?
A: Yes, but you must power the unit off completely first. Place it on a stable, flat surface and wear protective gloves to avoid injury from the sharp blades. Always ensure the mower is disconnected from the charging station before performing underside maintenance.