
How to Clean Robot Vacuum Drop Sensors Safely Without Scratching (Step-by-Step Guide + Mistakes to Avoid)
Aaron Cooper1. Introduction
If your robot vacuum suddenly refuses to cross a perfectly normal floor—or worse, spins in confusion near stairs—the culprit is often something tiny: dirty drop sensors. These small “eyes” underneath your robot are responsible for preventing falls and guiding navigation. But here’s the catch: clean them the wrong way, and you can permanently scratch the sensor window, degrading performance over time. In this guide, you’ll learn exactly how to clean drop sensors safely (without scratching), what tools to use or avoid, and how to prevent those frustrating false cliff errors for good.
2. What Are Drop Sensors and Why Scratches Ruin Performance

2.1 How Cliff Sensors Work (Infrared Reflection Explained Simply)
Think of your robot vacuum’s drop sensors as tiny flashlights constantly pointing at the floor. They emit infrared (IR) light and measure how much of that light bounces back. If the reflection suddenly drops—like at the edge of stairs—the robot instantly stops or turns away.
Simple, right? But also बेहद sensitive.
These sensors sit behind small plastic “windows” on the underside of the robot. When clean and clear, they read reflections accurately. But even a thin layer of dust or a smudge can interfere with how light travels in and out. That’s when things go sideways.
According to how cliff sensors rely on reflected infrared light, even small disruptions can trick the robot into thinking there’s a drop where none exists.
Result? Sudden stops. Random turns. Or a robot that refuses to clean half your home.
2.2 Why Dust, Scratches, and Moisture Cause False Errors
Now imagine this: you finally have a free Saturday morning… and your robot starts acting possessed. Stops. Spins. Avoids your dark rug like it’s lava.
What’s happening?
- Dust and debris create a thin film over the sensor window, weakening the reflected signal.
- Scratches scatter light in multiple directions instead of reflecting it cleanly back.
- Moisture? That’s even worse—it can seep inside, leading to corrosion or erratic readings over time.
There’s real-world evidence behind this. In fact, dirty navigation sensors contribute to a significant share of robot vacuum failures, highlighting just how critical proper maintenance is.
So while wiping sensors seems harmless, using the wrong method (like a damp cloth when it’s not allowed, or a rough paper towel) can actually create the problem you’re trying to fix.
Tiny damage. Big consequences.
2.3 Common Signs Your Drop Sensors Need Cleaning
Not sure if your sensors are the issue? Your robot usually tells you—just not in plain English.
Watch for these telltale signs:
- The robot stops suddenly on flat, clean floors
- It avoids dark carpets or tiles like there’s a cliff
- You notice spinning in place or erratic navigation
- It fails to dock properly or struggles to find its base
- Cleaning becomes inconsistent, with missed patches or repeated areas
These aren’t random glitches. They’re classic symptoms of compromised sensor readings. Many troubleshooting guides point out that simply cleaning the cliff sensors can resolve false alerts, navigation issues, and docking failures. It’s often the fastest fix—and the most overlooked.
3. Safe Step-by-Step Guide: How to Clean Drop Sensors Without Scratching
3.1 Preparation: Power Off, Positioning, and Proper Lighting
Before you even touch the sensors, slow down—this step is where most accidental damage happens.
- First, power off the robot completely and remove it from the charging dock. This prevents accidental movement while you’re working underneath.
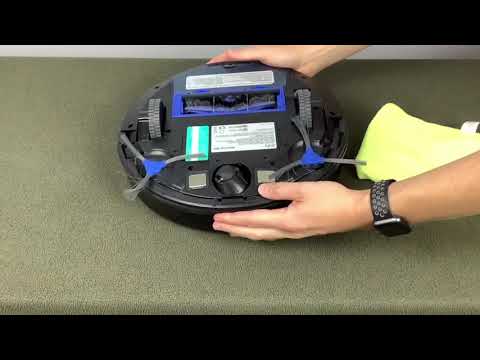
- Next, flip the robot upside down and place it on a soft towel or cloth. This protects both the robot’s shell and your floor from scratches.
- Ensure proper lighting. Use a flashlight or position yourself near a window to spot invisible dust or streaks.
Take a second to locate all the drop sensors along the bottom edges. Once you see them clearly, you’re ready.
3.2 Remove Loose Dust First (The Key to Preventing Micro-Scratches)
This is the step that separates safe cleaning from accidental damage. If you wipe the sensor before removing loose dust, you’re essentially dragging microscopic grit across a soft plastic surface.
- Use a soft-bristled brush (like a clean toothbrush) to gently sweep away debris
- Or use compressed air in short bursts from a safe distance
The goal is simple: remove anything that could act like sandpaper. This single step dramatically reduces the risk of micro-scratches—those invisible marks that slowly degrade sensor accuracy over time.
3.3 Gentle Wiping Technique Using Microfiber or Cotton Swabs
Now comes the core cleaning step—and this is where technique matters more than effort. Use a clean, dry microfiber cloth or a soft cotton cloth.
- Fold the cloth to create a clean, flat surface
- Wipe each sensor using light pressure only
- Use short, gentle strokes instead of scrubbing
- Switch to a clean section of the cloth if you see dirt buildup
For tight or recessed areas, use a dry cotton swab instead of forcing the cloth into small openings. No pressure. No aggressive rubbing. No shortcuts.
3.4 When (and If) You Can Use a Damp Cloth Safely
This is where things get tricky—and where many people go wrong. Some brands allow a lightly damp cloth for stubborn smudges. Others explicitly say: no liquids at all.
If—and only if—your specific manufacturer allows it:
- Lightly dampen a microfiber cloth (never dripping)
- Gently wipe once or twice
- Immediately follow with a dry cloth to remove moisture
Why so strict? Because moisture can seep into the sensor housing, leading to corrosion or long-term failure—something repeatedly observed in real-world repairs. When in doubt, skip the liquid.
4. Best vs Worst Cleaning Materials (Avoid Invisible Damage)
4.1 Why Microfiber Is Safest (and Paper Towels Are Risky)
Let’s be honest—when your robot throws a “cliff sensor error,” the first instinct is to grab whatever’s nearby. Paper towel. Tissue. Maybe even your T-shirt.
That’s exactly how long-term damage starts.
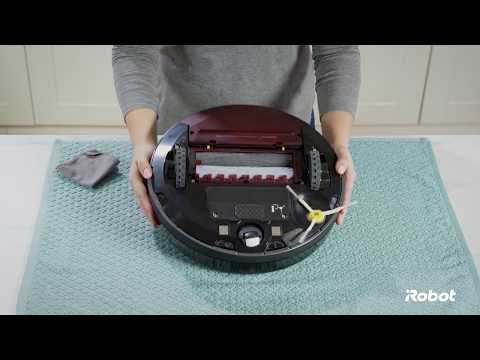
Microfiber isn’t just “softer”—it’s engineered to trap and lift dust particles instead of dragging them across the surface. Those ultra-fine fibers act like tiny hooks, pulling debris away from the sensor window so you’re not grinding it in.
Paper towels? Completely different story.
They’re made from wood fibers. Under pressure, those fibers behave like microscopic abrasives. Combine that with leftover dust, and you’re essentially sanding the sensor lens without realizing it.
Here’s the key difference in real life:
Microfiber
- Lifts dust away safely
- Zero abrasive wood fibers
- Reusable and eco-friendly
Paper Towel
- Pushes dust around
- Acts as a microscopic abrasive
- Can cause permanent haze
And over time, that difference becomes visible. Or worse—invisible damage that ruins performance.
If you care about keeping your robot navigating smoothly (and not randomly panicking near a rug), switching to microfiber isn’t optional. It’s essential.
4.2 The Hidden Danger of Micro-Scratches on Plastic Sensor Windows
Here’s the frustrating part: most sensor damage doesn’t happen all at once. It builds slowly. Silently.
Every time you wipe a dusty sensor without removing grit first… every time you use a slightly rough cloth… you create micro-scratches. You won’t see them immediately. But your robot will.
These sensors rely on clean, predictable infrared reflection. When the surface gets scratched, light doesn’t bounce back evenly—it scatters.
That tiny optical distortion turns into very real problems:
- The robot thinks there’s a drop where there isn’t
- It avoids safe areas
- It hesitates, spins, or reroutes for no reason
In more severe cases, users report persistent cliff errors traced back to scratched protective sensor lenses causing false readings—even after cleaning.
Because prevention is the only real repair.
4.3 Chemicals to Avoid (Alcohol, Ammonia, and Harsh Cleaners)
Now let’s talk about something even more damaging than scratches: chemicals.
It’s tempting to think, “If it’s dirty, I’ll just use a cleaner.” That works for countertops—not for sensor lenses.
Most manufacturers are very clear on this:
- Avoid alcohol-based cleaners
- Avoid ammonia or glass cleaners
- Avoid strong solvents like acetone
Why? Because these chemicals can cloud or degrade the plastic window over time. Even if it looks clean at first, you may be leaving behind a thin film or causing subtle material damage that affects how infrared light passes through.
"Stick to a rule of thumb: Dry microfiber first, only use slight moisture if your manual explicitly allows it, and never spray directly onto the robot."
It might feel like you’re doing less. But in reality, you’re avoiding the kind of damage that quietly turns a smart robot into a confused one.
5. How Regular Cleaning Prevents Errors and Extends Robot Lifespan

5.1 Recommended Cleaning Frequency Based on Home Conditions
Here’s the truth most people realize too late: you don’t need to deep-clean sensors often—but you do need to clean them consistently.
Because once buildup gets thick, you’re forced to clean harder. And that’s when scratches happen.
| Home Condition | Cleaning Frequency |
|---|---|
| Pets, kids, or daily runs | Once a week |
| Moderate use (2-3 times/week) | Every 2–4 weeks |
| Low use / minimal dust | Once a month |
This aligns with common manufacturer guidance and real-world usage patterns. A quick 2-minute wipe today prevents hours of troubleshooting tomorrow.
5.2 Daily Habits That Protect Your Sensors Long-Term
Want your robot to last years instead of months? The secret isn’t better cleaning—it’s less damage in the first place.
Small habits make a huge difference:
- Avoid running on wet floors: Moisture can seep into sensor housing and cause corrosion over time.
- Don’t store in humid or dusty areas: Garages or basements accelerate buildup and material wear.
- Keep floors relatively debris-free: Large grit like sand or cat litter can be dragged under the robot and scratch sensors.
- Handle the robot carefully: Dropping or dragging it can misalign or damage sensors.
- Empty dustbins and clean brushes regularly: Less circulating dust equals less sensor contamination.
5.3 Quick Fix Checklist for Common Sensor Errors
Robot acting weird again? Before you panic, run through this quick checklist:
- Power off and inspect sensors under good light
- Remove loose dust with air or a soft brush
- Wipe gently with a dry microfiber cloth
- Check for moisture exposure (recent mopping, spills, humidity)
- Look for visible scratches or haze on the sensor window
- Run a short cleaning cycle to test behavior
6. Conclusion
Cleaning your robot vacuum’s drop sensors isn’t complicated—but doing it wrong can quietly ruin performance over time. The safest approach is simple: remove dust first, use a dry microfiber cloth, apply minimal pressure, and avoid chemicals unless your manufacturer clearly approves them.
It takes just a few minutes, but the impact is huge. You prevent false errors, protect delicate sensor surfaces, and keep your robot navigating smoothly instead of acting confused.
More importantly, you avoid permanent damage from scratches or moisture—two of the most common (and costly) causes of sensor failure.
FAQ
Q: Can I use paper towels to clean my robot's cliff sensors?
A: Paper towels are not recommended because they are made of wood fibers that can act as abrasives. Over time, these can create micro-scratches on the plastic sensor windows, scattering infrared light and leading to persistent navigation errors or false cliff alerts.
Q: Why does my robot vacuum stop on dark rugs?
A: Most drop sensors use infrared light. Dark surfaces absorb this light rather than reflecting it back. If your sensors are also dirty or scratched, the weakened signal makes the robot think the dark rug is a cliff, causing it to stop or turn away.
Q: How often should I clean the sensors?
A: For homes with pets or heavy daily use, we recommend a quick wipe once a week. In cleaner environments with moderate use, every 2 to 4 weeks is sufficient to prevent the heavy dust buildup that necessitates riskier, aggressive cleaning.
Q: Is it safe to use rubbing alcohol on sensor windows?
A: Generally, no. Many manufacturers advise against alcohol or harsh chemicals as they can cloud or degrade the plastic lens. Unless your specific manual explicitly approves it, stick to a dry microfiber cloth or a very lightly dampened cloth with water.
Q: What is the best way to remove grit without scratching?
A: Always remove loose debris first using a soft-bristled brush or compressed air. Wiping a sensor that has visible grit on it is like using sandpaper; removing the particles first ensures that your microfiber cloth doesn't grind them into the surface.