
Aiper Seagull 1500 Battery Not Charging: Aggregated Fixes, Root Causes & When to Replace
Aaron Cooper1. Introduction
You pull your Aiper Seagull 1500 out of the pool, plug it in… and nothing. No charging. No response. Just that sinking feeling that your cordless pool cleaner—the one that’s supposed to save you hours—might be dead.
Here’s the good news: most “not charging” issues aren’t fatal. They usually come down to moisture, dirty contacts, or simple setup mistakes. In this guide, you’ll learn how to pinpoint the exact cause, fix it step by step, decode those confusing charger lights, and—just as importantly—know when it’s time to stop troubleshooting and call support.
2. Why Your Aiper Seagull 1500 Is Not Charging (Most Common Causes)
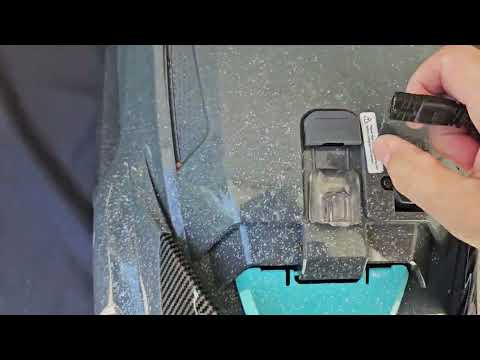
2.1 Dirty or Corroded Charging Pins: The #1 Hidden Culprit
Let’s start with the issue almost nobody checks first—but causes the majority of failures.
Every time your Seagull 1500 comes out of the pool, it carries microscopic moisture and minerals with it. If those charging pins aren’t dried properly, a slow chemical process kicks in. Over time, this leads to electrolysis-related corrosion on the charging contacts, which quietly blocks the electrical connection.
If your robot suddenly refuses to charge after working fine before, this is your prime suspect. Especially if it’s been used frequently and stored without careful drying.
No connection = no charge. Simple as that.
2.2 Moisture and Poor Contact After Pool Use
Ever tried charging it right after pulling it out of the water? That’s where things often go wrong.
Even if the robot looks dry, water can linger in the charging port or around the pins. That thin film of moisture acts like a barrier, preventing proper electrical contact. So you plug it in… and the charger just sits there, doing nothing useful.
This is why charging immediately after use often fails—not because the battery is bad, but because the connection isn’t truly established.
The fix isn’t complicated—but skipping it repeatedly leads straight to corrosion issues later. What feels like a small shortcut today becomes a bigger problem next week.
2.3 Wrong Charger or Power Setup Issues
This one is sneaky—and more common than people admit.
Using a third-party adapter might seem harmless, but the Seagull 1500 is designed for a very specific power input. If the voltage or current isn’t correct, charging can fail completely—or behave inconsistently.
According to official specifications, the unit expects a 12.6V / 2A power supply. Anything outside that range can result in slow charging, no charging, or even long-term battery damage.
| Power Component | Requirement/Specification |
|---|---|
| Input Voltage | 12.6V |
| Amperage | 2A |
| Environment | Indoor / Grounded Outlet |
There’s also the environment. Charging outdoors, using ungrounded outlets, or plugging into unstable power sources can all interfere with proper operation.
Worst case? You’re slowly degrading the battery without realizing it. If your setup feels “a bit improvised,” it’s worth tightening that up before assuming the robot itself is broken.
2.4 Battery or Motor Faults You Shouldn’t Ignore
Sometimes, the issue isn’t external. It’s internal—and no amount of cleaning will fix it.
A key signal to watch: runtime. After a full charge cycle (about 8 hours), the Seagull 1500 should run for around its expected 90-minute cleaning cycle. If it falls significantly short, the battery may be degrading or failing.
There’s also a less obvious clue: behavior during operation. If you ever notice a red indicator light while the robot is running (not charging), that points to a motor or internal fault—not a charging issue at all.
3. Step-by-Step Fixes That Solve Most Charging Problems
3.1 Clean and Fully Dry the Charging Contacts
If you only try one fix—make it this one.
- Start by wiping the charging pins with a dry paper towel or a cotton swab.
- Ensure you are clearing away invisible moisture and early-stage corrosion that blocks conductivity.
- Pause and give it a few minutes to let any remaining moisture evaporate completely.
- Plug the unit in once fully dry.
That waiting step? It’s the difference between a successful charge and another frustrating failure. This simple routine resolves a huge percentage of charging issues. No tools. No replacements. Just proper contact.
3.2 Charge Correctly: Environment, Adapter, and Timing
Now let’s eliminate setup mistakes.
- Always charge indoors using a grounded outlet.
- Avoid poolside charging where humidity and unstable power conditions can interfere.
- Stick with the original adapter.
Once plugged in, commit to a full charge cycle. The Seagull 1500 requires about 8 hours to fully charge. Cutting that short can lead to reduced runtime and false assumptions that the battery is खराब.
3.3 Understand Charger Indicator Lights (What They Really Mean)
The charger is your only source of truth—so knowing how to read it is critical.
| Light Status | Meaning |
|---|---|
| Solid red light | Charging in progress. This is exactly what you want to see. |
| Solid green light | Either fully charged or not properly connected to the robot. |
| Flashing or unusual colors | Indicates a potential issue with the charger itself. |
Here’s the catch: the robot doesn’t display charging status. Only the charger does.
So if you see a green light immediately after plugging in, don’t assume it’s fully charged. It could mean there’s no proper connection at all—often due to moisture or dirty pins. Once you understand these signals, troubleshooting becomes much more precise.
4. DIY Fix or Time to Contact Aiper Support?
4.1 Quick Self-Diagnosis Checklist Before You File a Claim
Before you assume the worst, slow down and run through a quick reality check—because most “dead” units aren’t actually dead.
- Check the Pins: Are the charging pins completely clean and dry? Not “looks dry,” but truly dry—no invisible moisture film.
- Monitor the Indicator: Plug in the charger and watch the indicator. A solid red light means charging is happening. A green light right away? That often signals poor contact, not a full battery.
- Review Usage History: Did the robot sit unused for a long time? Batteries can drop below the internal protection threshold, making it seem like it won’t charge at all. Or did it get stuck in the pool, quietly draining itself?
- Verify the Setup: Confirm the setup: original adapter, indoor outlet, stable power.
4.2 Clear Signs You Need Professional Repair or Replacement
Here’s the hard truth: not every charging issue is fixable at home.
If you’ve cleaned the pins, used the correct charger, and completed a full charge cycle—but still get nothing—it’s time to look deeper. One major red flag is when the charger behaves normally, yet the robot still won’t run or holds almost no charge.
Another telltale sign? The unit charges for hours but fails to reach its expected full runtime after a complete charge cycle. That usually points to battery degradation—not a connection issue.
And yes—there’s a pattern seen across real user reports: units that suddenly stop responding, show brief light flashes, then go completely dead.
At that point, continuing DIY fixes isn’t just frustrating—it’s wasted time.
4.3 Warranty, Returns, and What Aiper Will (and Won’t) Cover
If you’re within the warranty window, this is where things get easier—but only if you know the rules.
Aiper typically offers a limited warranty starting from the delivery date, along with a 30-day return window for defective units. That means if your Seagull 1500 fails early, you may be eligible for a replacement rather than a repair.
There’s also extended coverage options (like Aiper Care), which can stretch protection further and include additional service perks.
Aiper Warranty Covers
- Manufacturer defects
- Early battery failure (within terms)
- Defective charging units
What Voids Your Warranty
- Running the robot out of water
- Using the wrong adapter
- Physical damage or third-party repairs
- Missing proof of purchase
The smartest move? Document everything. Take photos, note charger behavior, and list what you’ve already tried. It speeds up support—and gets you back to a clean pool faster.
5. Prevent Future Charging Issues: Battery Care & Usage Habits
5.1 Smart Charging Habits That Extend Battery Life
Most battery problems don’t happen overnight—they build up from small habits.
If you regularly interrupt charging cycles or store the robot completely drained, you’re slowly shortening its lifespan. The Seagull 1500 is designed around full, consistent charge cycles. Let it run the full course. Let it recharge fully. That rhythm matters.
And here’s something many overlook: if the robot finishes a cycle but gets stuck somewhere, it can sit there idling and draining power unnecessarily. Next time you charge it, the battery feels “weaker”—but it’s actually been over-discharged.
Watch for early warning signs too. Shorter runtimes. Inconsistent behavior. These aren’t random—they’re signals.
5.2 Storage Tips: Avoid Long-Term Battery Damage
Planning to store your Seagull 1500 for the off-season? This is where a lot of silent damage happens.
Leaving it fully drained for months is one of the fastest ways to kill a battery. Instead, keep it in that sweet spot—partially charged, not empty, not full. Industry guidance consistently points to a mid-range charge level for storage.
- Clean the unit and dry all charging contacts thoroughly.
- Charge the battery to approximately 50-70%.
- Recharge it every three months to keep the battery active and healthy.
- Store in a cool, dry place away from direct sunlight.
Environment matters too. A cool, dry place beats a hot garage or damp shed every time. Heat accelerates battery degradation, while moisture invites corrosion back into the picture.
Think of storage as “pause mode,” not shutdown. Done right, your robot wakes up ready—not struggling.
5.3 Usage Mistakes That Quietly Drain or Damage the Battery
Some of the biggest battery killers don’t look like mistakes at all.
Running the robot out of water—even briefly—can strain internal components and lead to long-term damage. Letting it get stuck against a wall or step? It keeps trying to move, quietly burning through battery life without cleaning anything.
Even something as simple as inconsistent charging—skipping charges, partial top-ups, or long idle periods—adds up over time. And then there’s moisture neglect. Not drying the charging pins properly doesn’t just affect charging—it creates a cycle of poor contact, incomplete charging, and gradual battery stress.
6. Conclusion
Most Aiper Seagull 1500 charging issues aren’t catastrophic—they’re annoyingly simple. Moisture on the pins, poor contact, or setup mistakes account for the majority of failures, and they’re usually fixable in minutes.
But when the signs point deeper—failed full charges, abnormal lights, or collapsing runtime—that’s your cue to stop troubleshooting and start thinking about repair or replacement.
The real win isn’t just fixing the problem. It’s preventing the next one. Dry the contacts. Charge it properly. Store it smartly.
Do that, and your pool robot goes back to what it’s supposed to do: quietly handling the dirty work—while you stay out of it.
FAQ
Q: Why is my Aiper Seagull 1500 charger showing a green light immediately?
A: A green light typically indicates the battery is full or there is no connection. If the robot is not charged, this often signals that moisture or corrosion on the charging pins is preventing a proper electrical connection between the charger and the unit.
Q: How long does it take to fully charge the Aiper Seagull 1500?
A: According to technical specifications, the Seagull 1500 requires approximately 8 hours for a full charge cycle using the original 12.6V / 2A adapter. Partial charging or using third-party chargers may lead to inconsistent performance or reduced battery lifespan over time.
Q: Can I charge my pool robot immediately after it finishes cleaning?
A: It is highly recommended to dry the charging contacts thoroughly first. Residual moisture in the charging port can cause electrolysis-related corrosion or create a barrier that prevents effective charging, potentially leading to long-term hardware damage or failure to power up.
Q: What should I do if my Aiper Seagull 1500 runs for less than 90 minutes?
A: If runtime has significantly decreased despite a full 8-hour charge, this suggests battery degradation. Aggregated user data suggests checking for internal motor faults or ensuring the battery hasn't been stored in a fully depleted state for an extended period.
Q: How should I store the battery during the winter off-season?
A: Store the robot in a cool, dry place with a partial charge. To prevent the battery from dropping below the internal protection threshold, it is best practice to recharge the unit at least once every three months during long-term storage.