
How to Replace Tracks on Dolphin Premier: Step-by-Step Guide for Easy DIY Repair & Perfect Fit
Aaron Cooper1. Introduction
If your Dolphin Premier suddenly struggles to climb walls, slips in place, or just seems… tired, you’re not imagining it. The tracks—those rubber treads responsible for traction—quietly wear out over time, and when they do, your robot’s performance drops fast.
That’s exactly what this guide solves. By combining official Maytronics recommendations with real-world repair insights, you’ll get a simple, safe, step-by-step way to replace your tracks—and bring your cleaner back to life without guesswork.
2. When Should You Replace Dolphin Premier Tracks?

2.1 Clear Signs of Worn or Stretched Tracks
It usually starts subtly. Maybe your robot hesitates on slopes. Maybe it slips when trying to climb the wall. Then one day, it just spins in place like it’s lost its grip entirely.
That’s classic track wear. Over time, the rubber stretches, weakens, and loses tension.
And here’s the simplest test that pool techs consistently rely on: if you can easily slide your hand inside the gap between the track and the body, it’s done. A healthy track should feel tight—almost stubbornly tight.
This isn’t just cosmetic wear. Sun exposure, pool chemicals, and constant motion all degrade the material. What used to hug the rollers tightly becomes loose and sluggish.
The Results of Replacement
- Immediate better grip
- Smoother movement
- Restored wall climbing performance
- Moves like it's supposed to again
If your robot feels lazy, this is usually why.
2.2 Why Loose Tracks Can Damage Your Robot
Running your Dolphin Premier with loose tracks isn’t just inefficient—it’s risky.
When traction drops, the robot compensates by working harder. The drive system keeps pushing, but instead of smooth forward motion, you get slipping, jerking, and wasted energy. That extra strain builds up inside the motor and drive components.
According to repair guidance, loose tracks can cause slipping and unnecessary motor stress, and in some cases, the robot may stop moving altogether.
And that’s where a simple maintenance task turns into an expensive repair. Replacing tracks early is preventative maintenance at its best. It protects the motor, restores efficiency, and keeps your cleaner running like it should—quietly doing its job while you do literally anything else.
2.3 Choosing the Right Replacement Parts
Here’s where a lot of DIY repairs go sideways: picking the wrong parts—or thinking the right parts are wrong.
Maytronics produces multiple track variants. Some models use standard tracks (often available in different colors like gray or yellow but functionally identical), while others use mixed setups—like one long track and one short track. There are also specific part numbers tied to these variations.
In reality, the القديم one is պարզապես degraded. The safest move is sticking with genuine Maytronics parts. They’re designed to match the robot’s drive system, tension requirements, and long-term durability.
And yes—when you install them, they’ll feel very tight. That’s not a defect. That’s exactly what proper traction feels like.
4. Don’t Skip These Parts: Related Components to Check During Replacement
4.1 Guide Wheels, Pulleys, and Hex Pins Explained
Here’s something most first-time DIYers don’t realize until it’s too late: your tracks don’t work alone. They’re part of a tightly coordinated drive system where every component shares the load.
The guide wheels keep the track aligned. The pulley—positioned centrally—drives the motion. And inside that pulley, you may find a hex pin, which connects the drive motor to the moving parts. Depending on the robot’s configuration, there may be one or two hex pins, tied directly to how the motor distributes power.
That’s why during disassembly, it’s critical to pause and inspect—not just swap and rush. If anything looks worn, cracked, or stiff, deal with it now. Because installing brand-new tracks on worn internal components is like putting new tires on a misaligned car. It’ll work… but not for long.
4.2 When to Replace Tracks Together with Other Parts
If you’re already this deep into the repair, here’s the honest truth: doing the job halfway will cost you more time later.
Industry repair guidance consistently points out that track replacement often goes hand-in-hand with swapping out guide wheels and pulleys. Not because it’s mandatory—but because these parts wear together, at roughly the same pace.
| Pool Surface Type | Wear Impact on Components |
|---|---|
| Rough (Gunite/Plaster) | High friction; components wear significantly faster. |
| Smooth (Fiberglass/Vinyl) | Lower friction; might allow for longer intervals. |
Many technicians recommend bundling these replacements because it restores the entire drive system to balanced performance—not just one piece of it. Skip this, and you risk uneven wear, reduced traction, and… yep, opening the robot again in a few months. Do it once. Do it right. Then forget about it.
4.3 Brushes and Traction Components: Hidden Performance Factors
Let’s say you install brand-new tracks. They’re tight. Perfectly aligned. Everything looks right. But your robot still struggles to climb walls. Frustrating, right?
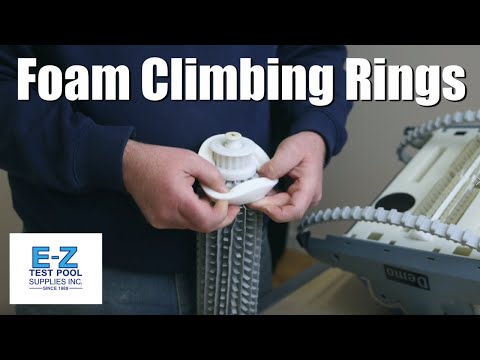
Here’s the missing piece: traction isn’t just about tracks. The brushes—especially those with foam climbing rings—play a huge role in gripping pool surfaces.
- Foam rings create friction against the pool wall for vertical climbing.
- Over time, rings harden, flatten, or wear below the brush line.
- Loss of flexibility leads to slipping on smooth surfaces like tile or fiberglass.
"Real-world repair insights show that when these rings lose flexibility, climbing performance drops significantly, regardless of how new the tracks are."
So while you’re replacing tracks, take a close look at the brushes. Because true traction isn’t one part. It’s a system. And when everything works together? That’s when your robot finally moves like new again.
5. Common Mistakes and Pro Tips for First-Time DIY Repairs
5.1 Mistakes That Can Damage Your Dolphin Premier
This is where most DIY repairs go sideways—not because the process is complicated, but because small mistakes snowball fast.
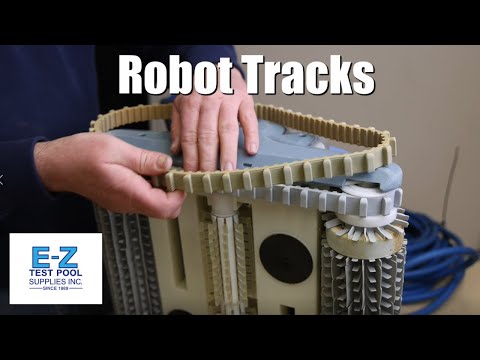
Another common issue is improper track routing. If the track isn’t correctly threaded under and between the guide wheels, it may look fine at first—but once powered on, it slips, jams, or derails.
And then there’s debris. Tiny things. Packaging scraps. Sand. Even a loose fragment can get caught in the gears. With how tight new tracks are, it doesn’t take much to completely stop movement. That’s why many repair guides emphasize checking for obstructions before reassembly, especially since small debris trapped in the drive system can stop the robot from moving entirely.
5.2 Why New Tracks Feel Too Tight (And Why That’s Good)
The first time you install new tracks, you’ll probably think: “There’s no way this is right.” They feel stiff. Hard to stretch. Almost too tight to fit. Good. That’s exactly what you want.
New tracks are designed to sit under tension. That tightness is what gives your Dolphin Premier the grip it needs to climb walls, turn smoothly, and move without slipping. Compare that to your old tracks—the ones you could easily slide your hand into. That looseness wasn’t normal. It was failure.
That tension is traction. That traction is performance.
5.3 When to Stop DIY and Check the Official Manual
Let’s be real for a second. While this guide pulls together the most reliable repair methods, there’s a gap that can’t be ignored: there is no fully detailed, Dolphin Premier-specific track replacement guide publicly available.
That means you’re working with generalized Dolphin instructions adapted across models. Most of the time, that’s enough. But if something doesn’t line up—if a part looks different, if a step feels unclear, or if your robot has a variation you didn’t expect—that’s your signal to pause.
The official Maytronics manual and support resources exist for a reason. They cover model-specific nuances that generic guides simply can’t. Because this isn’t just any appliance. It’s a sealed, motorized system designed to operate underwater.
6. Conclusion
Replacing the tracks on your Dolphin Premier isn’t just a repair—it’s a reset. When those worn, stretched treads finally give way to properly tensioned new ones, the difference is immediate: smoother movement, stronger grip, and wall-climbing that actually works again.
Yes, the lack of Premier-specific instructions makes things feel uncertain at first. But by following proven Dolphin repair principles—careful disassembly, correct track routing, and proper reassembly—you can confidently handle this yourself.
Just don’t treat it as a quick swap. Check the full system. Inspect wheels, pulleys, and brushes. Because real performance comes from everything working together. Do it right once, and your robot goes back to doing what it should: cleaning your pool quietly, reliably… while you enjoy your time instead of fixing it.
Check Price on Amazon
FAQ
Q: How do I know if my Dolphin Premier tracks need replacing?
A: Based on technical repair patterns, the most reliable test is the gap check. If you can easily slide your hand between the track and the robot's body, the rubber has stretched and lost the tension required for effective wall climbing and propulsion.
Q: Why do the new replacement tracks feel too short or tight?
A: Aggregated repair data shows that old tracks stretch significantly over time. New, genuine Maytronics tracks are designed to be extremely tight to ensure maximum traction. Using a tool for leverage during installation is a standard part of the replacement process.
Q: Can loose tracks damage the robot's motor?
A: Yes, data-driven analysis suggests that loose tracks cause the drive system to slip and jerk. This creates unnecessary resistance and heat within the motor assembly, potentially leading to premature motor failure if the tracks are not replaced promptly.
Q: Should I replace other parts at the same time as the tracks?
A: It is often recommended to inspect guide wheels and pulleys during track replacement. Since these components share the drive load and wear at similar rates, replacing them together ensures balanced performance and prevents the need for frequent disassembly.
Q: Why is my robot still not climbing walls after replacing tracks?
A: If tracks are new, the issue often lies with the brushes or foam climbing rings. These components provide the necessary friction against pool surfaces; if they are hardened or worn down, even brand-new tracks cannot provide enough grip.