
Lawn Preparation: What to Do Before Running a Robot Mower (Complete Setup & Pre-Install Checklist)
Aaron Cooper1. Introduction
A robot mower doesn’t magically fix a messy lawn—it exposes it. Every bump, hidden rock, or overgrown patch becomes a navigation error, a missed strip, or worse, a stuck robot blinking helplessly in the yard.
That’s why preparation isn’t optional. It’s the difference between a lawn that quietly maintains itself and one that constantly demands rescue missions. From assessing your terrain and clearing hazards to planning mapping zones and setup, a few hours of prep upfront can mean months of hands-free mowing. Skip it, and you’ll feel it every single week.
2. Step-by-Step Lawn Preparation Checklist Before First Run

2.1 Start with a Full Lawn Assessment (Size, Terrain, and Suitability)
Before you even think about turning the mower on, take a step back and look at your lawn like a machine would.
How big is it—really? Not a guess. Robot mowers are designed with specific coverage limits, and undersizing is one of the fastest ways to turn “automation” into frustration. Many guides recommend measuring your lawn using map tools and choosing a mower that comfortably handles the total area, not just barely meets it.
Terrain is the next reality check. Slopes, uneven patches, and tight layouts all affect performance. Most residential models handle moderate inclines, but once your yard starts resembling a mini ski slope, you’ll need to plan exclusions or adjustments. Even small dips or roots can interrupt a smooth run.
Do this once, properly. It saves endless troubleshooting later.
2.2 Clear Debris and Remove Hidden Hazards
This is where most people underestimate the problem.
You look at your lawn and think, “It’s pretty clean.” But to a robot mower, a small twig or half-buried stone isn’t harmless—it’s a blade killer or a navigation trap.
Industry guidance is blunt: remove everything. Stones, sticks thicker than a few millimeters, toys, tools, even low obstacles under about two inches. Why? Because the mower will either run over them (damaging itself) or avoid them entirely—leaving ugly, untouched patches behind.
Imagine expecting a perfectly cut lawn, only to see random “donut-shaped” missed areas where the mower dodged a garden toy or low sprinkler head.
Even more subtle: debris tends to collect near trees and edges. These are exactly the areas where your mower already struggles most.
Simple step. Massive payoff.
2.3 Pre-Mow Your Lawn to the Ideal Height
Here’s the truth most first-time owners learn the hard way: Robot mowers are not designed to tame wild, overgrown grass. They’re maintenance machines.
If you send one into a jungle of tall grass, you won’t get a clean cut—you’ll get clumps, uneven patches, and a mower that struggles far more than it should. That’s why experts consistently recommend starting with grass under about 7cm before the first robotic cut.
If your lawn is taller than that, use a traditional mower first. Bring it down gradually—never cutting more than about a third of the blade length at once—to avoid stressing the grass.
Once you’re in range, start your robot at a higher cutting setting and slowly lower it over a few sessions. This creates that signature “always perfect” look robot mowers are known for.
Think of it like switching from occasional deep cleaning to daily light maintenance. Once you’re in that rhythm, the lawn never gets out of control again.
2.4 Fix Uneven Ground, Holes, and Drainage Issues
If your lawn has ever caused you to trip, your robot mower is going to hate it even more.
Uneven ground is one of the biggest causes of real-world frustration. Small holes turn into trap zones. Raised roots become collision points. Soft, muddy patches? That’s where your mower spins its wheels and gives up.
The result? You’re no longer “hands-free”—you’re rescuing your mower every other day.
The fix isn’t complicated, but it does require attention:
- Fill low spots and ruts with soil
- Smooth out bumps and molehills
- Cover or isolate exposed roots
- Improve drainage where water pools
Even minor leveling can dramatically improve performance. A smoother lawn means cleaner cuts, fewer interruptions, and a robot that actually finishes the job without babysitting.
3. Planning Your Robot Mower Setup: Mapping, Zones, and Navigation

3.1 Wired vs. RTK (Wire-Free) Setup: What You Need to Prepare
This is where things get interesting—and where your prep strategy completely changes.
Traditional wired systems rely on a physical boundary loop. That means planning, laying, and sometimes burying a cable around your lawn and obstacles. It’s more work upfront, no question. But once installed, it’s rock-solid—even under trees or in tricky layouts.
RTK (Real-Time Kinematic) systems, on the other hand, feel like magic. No wires. You map your lawn digitally, often guiding the mower via app while it learns the boundaries. In ideal conditions, these systems can achieve centimeter-level positioning accuracy, creating those perfectly straight, “striped lawn” results.
Wired Strategy
- Plan clean routes
- Avoid sharp turns
- Prepare for physical installation work
RTK Strategy
- Evaluate sky visibility
- Avoid signal-blocked zones
- Position base station carefully
3.2 How to Plan Zones, Obstacles, and Lawn Layout
Now imagine your lawn from above. Where are the tight corners? The narrow side paths? The flower beds you absolutely don’t want touched? This is where a simple sketch becomes incredibly powerful.
Start by mapping:
- Main mowing areas
- Obstacles like trees, beds, ponds
- Narrow passages or tricky transitions
- Separate zones (front yard vs. backyard, for example)
Why does this matter? Because robot mowers don’t “figure it out” the way humans do. They follow logic—either through boundary wires or digital maps. If you ignore layout planning, you’ll see it immediately:
- Areas that never get cut
- Spots the mower avoids entirely
- Sections that require manual intervention
For multi-zone lawns, planning becomes even more important. Some setups require guiding paths, while others may require physically moving the mower between areas. Done right, your mower flows smoothly across the entire space. Done wrong, it gets confused. Fast.
3.3 Choosing the Perfect Charging Station Location
This might seem like a small detail. It’s not. A poorly placed charging station is one of the most common reasons robot mowers fail to perform consistently.
The ideal setup:
- Flat, level ground (even slight slopes can cause docking failures)
- Clear, straight approach path with no obstacles
- Close to a reliable power source
- Protected from excessive sun and sprinkler spray
If you get this right, you’ll never think about it again. If you get it wrong, you’ll notice it every single day.
4. Is Your Lawn Compatible with a Robot Mower?
4.1 Lawn Size, Complexity, and Multi-Zone Considerations
Here’s the uncomfortable truth: not every lawn is “robot-ready” out of the box.
You might picture effortless automation—but if your lawn is too large, too fragmented, or full of disconnected zones, that dream quickly turns into constant micromanagement. Robot mowers work best when they can roam freely and consistently. The more interruptions, the more inefficiency.
Start with size. If your mower is constantly heading back mid-session, your “hands-free” setup suddenly feels… very hands-on.
Now think about layout. A simple, open lawn? Perfect. But if your property looks like a puzzle—front yard, fenced backyard, narrow side strips—you need a plan. Some systems support multi-zone mapping, but others require physically carrying the mower between areas. And yes, that gets old fast.
Robot mowers thrive on consistency. The more you simplify your lawn flow, the smoother everything becomes.
4.2 Slopes, Narrow Passages, and Terrain Limitations
This is where many setups quietly fail.
On paper, robot mowers can handle slopes. In reality? It depends. Gentle inclines are fine, but once you push toward steeper gradients, traction becomes unpredictable—especially when the grass is wet. That’s when you start seeing wheel spin, missed sections, or the dreaded “stuck” alert.
Then there are narrow passages. That charming little strip between your house and fence? If it’s too tight, your mower may hesitate, turn around, or skip it entirely. Many guidelines suggest keeping passages wide enough—around a meter—for reliable navigation.
And transitions matter just as much as slopes. Sharp drops, raised edges, or uneven joints between lawn and pavement can stop a mower cold. It doesn’t take much—just a few centimeters of awkward height difference.
The fix isn’t always buying a better mower. Often, it’s small adjustments:
- Widen tight corridors
- Smooth transitions with soil or edging
- Exclude problem slopes before they cause daily frustration
A robot mower doesn’t need a perfect lawn. But it does need a predictable one.
4.3 Boundaries, Edges, and the Reality of Edge Trimming
Let’s clear up one of the biggest misconceptions.
Robot mowers do not eliminate edge trimming.
No matter how advanced the navigation—RTK, vision systems, or boundary wires—there’s always a small buffer between the blade and the edge. That means along walls, fences, and flower beds, you’ll still see a thin strip of untouched grass.
Why? Physics. The cutting disc sits inside the mower body for safety, so it simply can’t reach all the way to vertical edges.
For vision-based systems especially, boundaries need to be visually clear and consistent. In fact, many guides highlight that effective navigation relies on well-defined edges with strong visual contrast—like grass meeting gravel, pavers, or mulch. Without that contrast, the mower may struggle to “see” where to stop.
So how do you reduce manual work?
- Install flush edging (like pavers level with the lawn) so the mower can ride partially over it
- Avoid sharp inside corners where grass tends to be missed
- Use consistent borders instead of irregular, messy edges
Think of it this way: you’re not eliminating trimming—you’re minimizing it. And when done right? That “quick touch-up every couple of weeks” feels a lot better than wrestling with a full lawn every weekend.
5. Common Setup Mistakes (and How to Avoid Them Before First Run)
5.1 Docking Failures and Poor Charging Station Placement
Nothing kills the “set it and forget it” promise faster than a mower that can’t dock.
It usually starts like this: the mower finishes its job, heads back… then hesitates. Misses the dock. Tries again. And again. Suddenly, you’re outside, manually lining it up like it’s a stubborn shopping cart.
Guidelines are clear: keep the dock on flat ground, with a straight, open approach—ideally with at least a meter or more of unobstructed space in front. Avoid funnels, tight corridors, or placing it right against walls.
And don’t ignore the surface. Soft soil may seem fine at first, but repeated traffic creates ruts that slowly ruin alignment.
Fix it once:
- Level the ground (or use a solid base like pavers)
- Clear the approach path completely
- Give it space to “think” and align
5.2 RTK Signal Problems and Navigation Errors
RTK mowers feel like magic—until they don’t.
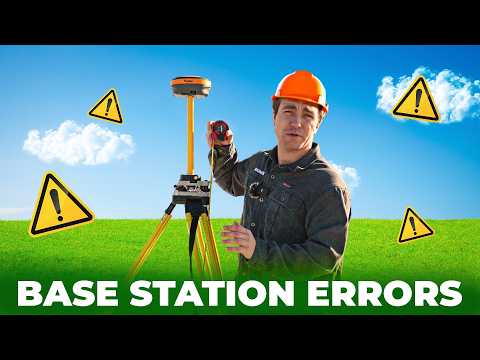
One day, your mower is cutting perfect lines. The next, it’s drifting, pausing, or throwing position errors. The problem usually isn’t the mower itself—it’s the environment. RTK relies on a clear view of the sky. Trees, buildings, fences, even metal structures can interfere with signals.
Optimal RTK Conditions
- Open, elevated sky visibility
- Clear, consistent satellite reception
- Level terrain without interference
Common Trouble Spots
- Dense tree cover
- Narrow yards between high walls
- Proximity to metal sheds or roofs
The solution is all about setup:
- Place the RTK base station in an open, elevated area.
- Avoid mounting near walls or under roofs.
- Identify weak-signal zones early and exclude them if necessary.
RTK is powerful—but only when your lawn cooperates.
5.3 Uneven Terrain and ‘Getting Stuck’ Issues
If there’s one frustration that turns excitement into regret, it’s this: the mower keeps getting stuck.
And the causes are almost always hiding in plain sight—small dips, soft soil, exposed roots, or uneven transitions. Things you barely notice walking across the lawn become full-blown obstacles for a low-clearance robot.
Before your first run:
- Fill ruts and holes with compacted soil
- Smooth out bumps and molehills
- Firm up soft or muddy areas with better drainage
- Create gentle ramps where lawn meets hard surfaces
Once your lawn is smooth and predictable, those “rescue missions” disappear. And that’s when the magic finally happens.
6. Conclusion: A Smooth Start Means a Hands-Free Lawn
A robot mower doesn’t succeed because it’s smart—it succeeds because your lawn is ready for it.
Every step you take before the first run—clearing debris, leveling ground, planning zones, optimizing dock placement—directly determines whether your experience feels effortless or endlessly frustrating. Skip the prep, and you’ll spend your time troubleshooting. Do it right, and the mower quietly takes over.
The payoff is real. A lawn that never gets out of control. No more weekend mowing sessions. Just consistent, automatic maintenance in the background.
Preparation is a one-time investment. A few focused hours now can save you dozens later—and finally deliver a truly hands-free lawn.
FAQ
Q: Do I need to cut my grass before using a robot mower for the first time?
A: Yes. Robot mowers are maintenance tools designed for frequent trimming, not taming overgrown yards. It is recommended to use a traditional mower to bring the grass height down to approximately 7cm or lower before the robot's initial run to prevent motor strain and clumping.
Q: Will a robot mower eliminate the need for manual edge trimming?
A: No. Due to safety designs, cutting blades are typically inset from the mower's outer shell. This creates a small buffer zone along walls and fences. While flush edging can minimize this, most users will still need to perform occasional manual touch-ups on lawn borders.
Q: Where is the best place to install the charging station?
A: The charging station should be placed on flat, level ground with a straight approach path of at least one meter. It requires proximity to a power source and should ideally be protected from direct sunlight and heavy sprinkler spray to ensure consistent docking.
Q: What are the main obstacles to RTK signal accuracy?
A: RTK systems require a clear line of sight to satellites. Heavy tree canopies, tall buildings, narrow corridors, and even large metal structures can interfere with the signal, potentially causing navigation errors or leading the mower to drift from its mapped path.
Q: How do I prevent my robot mower from getting stuck?
A: Most "stuck" errors occur due to uneven terrain. You should fill in low spots with soil, smooth out molehills, and remove debris like thick branches or stones. Ensuring a smooth transition between the grass and hard surfaces will also significantly reduce manual interventions.