
Fixing a Squeaky or Noisy Robot Vacuum Wheel: Easy DIY Fixes, Causes & When to Replace
Aaron Cooper1. Introduction: Why Your Robot Vacuum Wheel Is Suddenly Noisy
One day it’s quietly doing its thing… the next, it sounds like a squeaky shopping cart dragging across your floors. Annoying, right?
That sudden wheel noise usually isn’t random. In most cases, it comes down to a few very fixable culprits: hair wrapped around the axle, debris jammed in the wheel well, a dry (and crying-for-help) axle, or parts that have shifted slightly out of place. The good news? Most of these don’t require tools, tech skills, or a service appointment.
2. Step 1: Confirm the Noise Is Coming From the Wheel
2.1 Quick 30-Second Sound Check to Isolate the Source
Before you flip your robot upside down and go full DIY mode, pause for a second—because not every weird sound is a wheel problem.
Start with a simple listening test. Let the robot run and pay attention. Is it a high-pitched squeak? A grinding crunch? A rhythmic click? Each sound tells a different story. For example, a squeak that appears only when the robot moves or turns is often tied to wheel friction, while constant humming usually points to the motor or airflow.
Also notice when it happens. Only during turns? Only on hard floors? That pattern matters. A quick 30-second sound check method used in multiple diagnostics suggests that repeatable, location-specific noise is your biggest clue.
If the sound changes when the robot changes direction, you’re almost certainly dealing with a wheel.
2.2 Simple Tests: Spin, Press, and Run Without Brushes
Now let’s get hands-on—but keep it simple.
- Manual Spin: Flip the robot over (powered off) and manually spin each wheel. You’re listening for resistance, squeaks, or that gritty “something’s not right” feeling. A healthy wheel spins smoothly and quietly. If one wheel complains immediately, you’ve found your culprit.
- Pressure Test: Try a light pressure test. Spin the wheel again while gently pressing it inward. If the squeak only shows up under pressure, that’s a classic sign of a dry axle or friction inside the wheel housing.
- Isolation Test: Remove the main brush and brush guard, then run the robot briefly. If the noise disappears, it was never the wheel—it was the brush assembly all along.
If the noise stays, even with brushes removed, and especially if you can reproduce it by hand, you’re dealing with a confirmed wheel issue. At that point, you’re no longer guessing—you’re fixing.
3. Quick Fixes: Stop the Squeak Without Taking Anything Apart
3.1 Remove Hair and Debris From Wheels in Minutes
Here’s the reality: most squeaky wheels aren’t “broken”—they’re just dirty.
Flip your robot over and look closely at the gaps where the wheels meet the body. You’ll often spot hair packed in like a tiny rope. Grab tweezers, a small brush, or even your fingers, and gently pull it out. Rotate the wheel as you clean so you don’t miss hidden strands.
Pay extra attention to the front caster. It’s smaller, spins more freely, and collects debris faster. According to multiple manufacturer maintenance guides, this is one of the most common sources of squeaking.
- Clear visible hair from side drive wheels
- Check the front swivel wheel for trapped grit
- Rotate wheels manually while cleaning to expose hidden debris
Once cleaned, spin the wheels again. If the noise disappears instantly, you’ve just fixed the problem in under five minutes.
No tools. No disassembly. Just silence.
4. Deep Fix: Step-by-Step Troubleshooting for Persistent Wheel Noise
4.1 Inspect Wheels for Damage, Wear, or Misalignment
So you cleaned everything… and the squeak is still there. That’s when it stops being “just dirt” and starts becoming a mechanical issue.
Flip the robot over and take a slower, more critical look. Spin each wheel and watch closely. Does one wobble slightly? Does it feel rough, like something inside is catching? These are classic signs of wear—especially inside the wheel’s bearing or axle interface.
Also check the tire itself. Flat spots, cracks, or uneven tread can create a rhythmic squeak or thump every rotation. It’s subtle at first… then impossible to ignore. Over time, this kind of wear doesn’t just make noise—it affects how your robot moves, turns, and even docks.
Here’s the honest truth: cleaning fixes friction from dirt. It doesn’t fix worn parts. If your inspection reveals rough spinning or visible damage, you’re likely looking at a replacement—not another round of DIY cleaning.
4.2 Clean Wheel Wells, Housings, and Nearby Components
Now let’s go deeper—because what you don’t see is often the real problem.
Even if the wheel itself looks clean, the wheel well (the cavity it sits in) can be packed with fine dust, grit, and tiny debris. This hidden buildup creates constant friction as the wheel rotates, leading to that persistent squeak that refuses to go away.
- Use a soft brush or an old toothbrush to clean inside the wheel housing.
- Rotate the wheel as you go so you can reach all angles.
- If you spot compacted dust or debris tucked behind the wheel, gently loosen it and remove it.
Don’t stop at the wheel. Check nearby components—edges of the housing, seams, and any tight gaps. According to multiple manufacturer-style maintenance guides, debris in these areas can rub against moving parts and mimic a “wheel problem” even when the wheel itself is fine.
This is where many people give up too early. They clean what’s visible… but the noise lives underneath.
Clean thoroughly. Then test again. If the sound softens or disappears, you’ve just eliminated one of the most stubborn hidden causes.
4.3 Check for Loose Parts and Reassemble Correctly
Sometimes the noise isn’t friction—it’s vibration.
A slightly loose brush guard. A misaligned wheel module. A cover that didn’t click back into place after cleaning. These small issues can create rattling, squeaking, or even rhythmic tapping that sounds exactly like a bad wheel.
You can also do a simple shake test (with the robot powered off). If you hear something faintly rattling inside, that’s your clue.
Manufacturer troubleshooting guides consistently point out that loose components are a common source of noise, especially after maintenance or part removal. The fix is often as simple as reseating everything properly.
Take a minute to remove and reinstall anything that looks even slightly off. Make sure each piece clicks or locks into place. Then run the robot again. No more rattle. No more mystery noise. Just smooth movement.
4.4 Apply Lubrication Properly (Without Causing New Problems)
If cleaning didn’t solve it, and the wheel still squeaks when you spin it, you’re likely dealing with a dry axle. This is where lubrication comes in—but done wrong, it can make things worse.
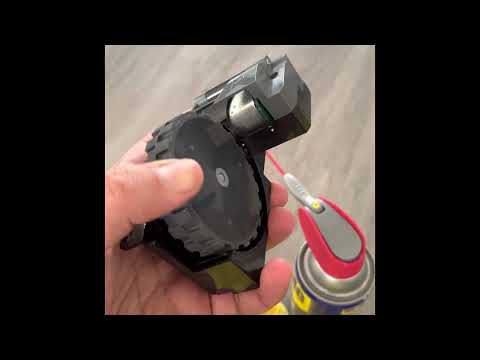
Target the exact friction point. Many wheels have a small access gap or opening where the axle sits. That’s your entry point. As shown in teardown-style demos, you can often apply a small amount of dry silicone lubricant directly to the wheel axle without taking the robot apart.
Apply a tiny amount. Then rotate the wheel slowly to work it in. You should feel the difference almost immediately—smoother, quieter motion.
Important: wipe off any excess. Especially on the tire. You don’t want slipping or residue on your floors.
5. Beyond the Wheel: Other Causes of Robot Vacuum Noise & Prevention Tips
5.1 Common Non-Wheel Noise Sources (Brushes, Filters, Motors)
Here’s the trap: not every squeak is a wheel—even if it sounds like one.
Robot vacuums are full of moving parts, and several of them can mimic wheel noise almost perfectly. The most common culprit? The main brush. Hair wrapped tightly around the brush ends creates friction that sounds like a squeaky axle. Remove the brush, and suddenly… silence.
Filters are another sneaky one. When airflow is blocked, the motor works harder, producing a louder, strained sound—often mistaken for mechanical noise. According to multiple manufacturer guides, clogged filters are one of the top reasons vacuums suddenly sound louder than usual.
- Main Brush: Hair tangles around ends causing friction squeaks.
- Filters: Clogged airflow makes the motor sound strained.
- Side Brushes: Bent brushes slapping the floor create rhythmic clicking.
- Internal Components: Worn belts or gears produce grinding.
The key difference? Wheel noise usually changes with movement or direction. Motor or airflow noise stays constant. If your robot sounds loud even when stationary, it’s probably not the wheels.
5.2 Simple Maintenance Routine to Keep Your Robot Quiet
Want to avoid ever dealing with this again? It comes down to one thing: consistency. Most noise issues don’t appear overnight—they build up slowly. A bit of hair here. Some dust there. Then one day, your quiet helper sounds like it’s falling apart.
| Frequency | Maintenance Task |
|---|---|
| After Every Few Runs | Empty dustbin and perform visual check of wheels |
| Weekly | Remove hair from brushes and inspect wheel areas |
| Monthly | Clean caster wheel and check for hidden debris in wheel wells |
Manufacturer recommendations consistently emphasize regular wheel and brush cleaning as the single most effective way to prevent noise and performance issues. Think of it like this: five minutes of maintenance now… or an hour of troubleshooting later. Your future self will thank you.
5.3 Floor Prep and Usage Habits That Reduce Noise
Here’s something most people overlook: your floors play a huge role in how noisy your robot becomes. Loose debris—like strings, pet toys, crumbs, or even small pebbles—can get pulled into wheels or brushes, instantly creating grinding or clicking sounds.
Before starting a cleaning cycle, do a quick sweep of problem areas:
- Pick up cords and small objects
- Clear pet toys and loose fabrics
- Avoid running over wet or sticky debris
Also consider surfaces. Hard floors can amplify sound, especially if fine grit gets trapped under the wheels. That “chirp” you hear? Often just friction between debris and flooring. Even usage habits matter. Running max suction all the time increases overall noise and wear. Switching to a quieter mode when possible reduces stress on components.
Bottom line: a clean path = a quieter robot.
6. Conclusion: When a Squeaky Wheel Is a Quick Fix vs a Replacement Signal
Most squeaky robot vacuum wheels aren’t a disaster—they’re a maintenance reminder.
Quick Fixes
- Hair/Debris removal
- Cleaning wheel wells
- Applying dry lubricant
Replacement Signals
- Persistent grinding sounds
- Visible wheel wobbling
- Rough/Sluggish spinning
If the sound sticks around—especially with grinding, wobbling, or rough spinning—that’s your signal. At that point, you’re not dealing with dirt anymore. You’re dealing with wear. And pushing a worn wheel too long doesn’t just make noise—it can affect movement, navigation, and long-term reliability.
So here’s the simple rule: Clean first. Lubricate if needed. Inspect honestly.
If it still sounds wrong, it probably is. Fix it early, and your robot goes back to being what it should be—quiet, effortless, and one less thing you have to think about.
FAQ
Q: What is the best lubricant for a squeaky robot vacuum wheel?
A: Based on maintenance best practices, you should only use dry lubricants such as silicone or PTFE spray. Avoid wet oils like WD-40 or vegetable oil, as these attract dust and pet hair, which can create a thick sludge that eventually worsens the friction and noise.
Q: How do I know if the noise is coming from the wheel or the brush?
A: A simple diagnostic test is to remove the main brush and brush guard then run the robot briefly. If the squeaking persists while the robot moves without its brushes, the issue is confirmed to be within the wheel assembly or the wheel motor itself.
Q: Why does my robot vacuum wheel squeak only on hard floors?
A: This usually indicates friction between the wheel's surface and the floor, often caused by trapped grit or a "flat spot" on the tire. It can also be a sign of a dry axle that only chirps under the specific resistance provided by hard surfaces.
Q: Can hair inside the wheel axle cause permanent damage?
A: Yes, if left uncleaned, tightly wrapped hair creates constant heat and friction. Over time, this can melt plastic components, wear down the metal axle, or strain the wheel motor, eventually requiring a full replacement of the wheel module rather than a simple cleaning.
Q: When should I stop repairing and just replace the wheel?
A: If you have thoroughly cleaned and lubricated the wheel but still notice physical wobbling, grinding sounds, or if the robot is no longer traveling in a straight line, the internal bearings are likely worn out and a replacement module is necessary.