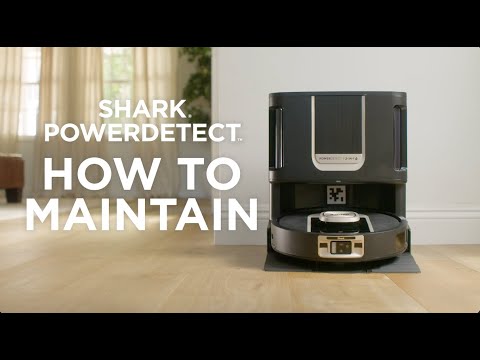
How to Deep Clean a Self-Emptying Base Station and Water Tanks (Step-by-Step for Odor-Free, Peak Performance)
Aaron Cooper1. Introduction
Self-emptying robot vacuums promise a “hands-free” life—but if you’ve ever opened that base station and caught a whiff… you already know the truth.
Over time, dirty water tanks develop sludge, dust builds up in air channels, and hidden moisture creates the perfect breeding ground for odors and bacteria. Worse? That buildup doesn’t just smell—it quietly kills suction power and clogs water systems, leading to weak cleaning performance. According to maintenance guidance, accumulated debris can reduce efficiency and even shorten the lifespan of your machine.
The good news: a proper deep clean resets everything. In this guide, you’ll learn exactly how to take your base station apart, clean every critical component, and keep it running like new—odor-free, clog-free, and genuinely hands-off again.
2. Step-by-Step: How to Deep Clean a Self-Emptying Base Station and Water Tanks

2.1 Safety First: Power Down and Identify Wet vs Dry Components
Before you touch anything, stop. This is where most people accidentally damage their dock.
A self-emptying base station combines electronics (motors, sensors, charging contacts) with water-handling components—and mixing those up is a fast track to expensive repairs. Always power off the robot, remove it from the dock, and unplug the base completely. No exceptions.
Next, mentally split your system into two zones:
- Dry-only: sensors, charging pins, internal electronics, air ducts
- Water-safe: tanks, wash trays, some filters, mop-related parts
Think of it like cleaning a laptop next to a sink—you wouldn’t spray everything down and hope for the best. Get this step right, and everything else becomes safe and straightforward. Skip it, and you risk turning a simple cleaning session into a repair bill.
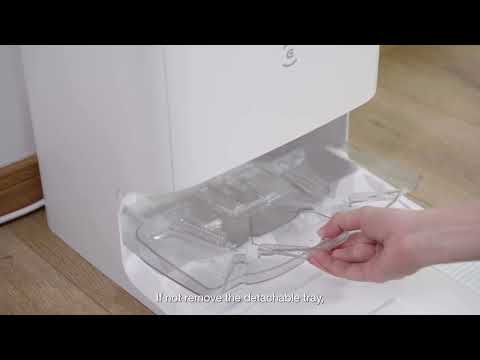
2.2 Disassemble the Base: Dust Bag, Filters, Tanks, and Wash Tray
Now comes the satisfying part—taking everything apart and finally seeing where all that hidden grime lives.
Most self-emptying stations follow a similar structure. Under the lid, you’ll typically find the dust bag (or bin), clean water tank, dirty water tank, filters, and a wash tray tucked below. The trick is removing them in the right order so you don’t miss anything.
Start from the top:
- Open the main compartment
- Remove the dust bag or internal bin
- Pull out the clean and dirty water tanks
- Lift out the wash tray and any small filters or strainers
- Access and remove base filters if present
As you go, you’ll probably notice something unsettling—fine dust coating corners, moisture residue around seals, maybe even that slightly slimy feeling in the tray. Totally normal. Also totally the reason your “self-cleaning” system doesn’t feel so clean anymore.
This full disassembly is crucial because partial cleaning leaves behind buildup in exactly the places that cause odors and clogs. If you can’t see it, you can’t clean it.
2.3 Clean the Dry System: Dust Path, Filters, and Air Channels
This is where performance lives—or dies.
If your robot suddenly feels weaker, leaves debris behind, or sounds like it’s struggling during auto-emptying, the culprit is almost always the dry system. Dust doesn’t just sit neatly in the bag—it creeps into air channels, clogs filters, and restricts airflow.
Start with the basics:
- Replace or empty the dust bag/bin
- Tap out loose dust from filters
- Rinse filters only if your manual allows (some must stay dry)
In fact, consistent maintenance guidance shows that dust and debris buildup directly reduces suction efficiency, which explains why your robot suddenly “misses spots” even though nothing else changed.
You might be surprised how much fine powder is hiding in these areas. It’s not dramatic—but it’s enough to choke airflow. Finish by wiping the interior with a dry cloth and gently cleaning charging contacts. No water here.
2.4 Deep Clean the Water System: Tanks, Tray, and Hidden Sludge Areas
If there’s one place where things go from “a little dirty” to “what is THAT smell?”—it’s here.
The water system is a perfect storm: moisture, dirt, and time. That combination creates biofilm—a slimy layer of bacteria that clings to tank walls, seals, and corners you don’t normally see.
Start with the clean water tank:
- Empty any leftover water (never let it sit)
- Wash with warm water and mild detergent
- Use a bottle brush to scrub corners and the outlet area
- Rinse thoroughly until no residue remains
Now the real troublemaker: the dirty water tank. A quick rinse won’t cut it. You need to:
- Shake and rinse out loose debris
- Scrub the interior walls with a long-handled brush
- Focus on waterline stains, corners, and inlet/outlet ports
- Clean seals and lids where grime hides
Finally, tackle the wash tray by removing hair, lint, and debris, and scrubbing tight corners. This step alone can completely eliminate that “mystery odor” people assume is unavoidable.
2.5 Drying and Reassembly: Prevent Mold Before It Starts
You’ve cleaned everything. It looks spotless. You’re done… right? Not yet. Moisture is the enemy.
| Component | Recommended Drying Time |
|---|---|
| Filters | At least 24 hours |
| Water Tanks | 24–48 hours (lid open) |
| Wash Tray | Until fully dry, no standing water |
Reassembling too early is like putting wet laundry back in the basket. Once everything is completely dry:
- Reinstall the tray and filters
- Insert clean and dry tanks
- Replace dust bag or bin
- Close all compartments securely
Then plug the base back in and run a short test cycle. No smell. No clogs. Just smooth, quiet operation.
3. Maintenance Best Practices: Keep Your Base Station Clean Longer
3.1 How Often Should You Clean Each Component?
Here’s the uncomfortable truth: most people don’t clean their base station until something smells or breaks. By then, you’re not maintaining—you’re recovering.
A smarter approach is a simple rhythm:
- After each mop use: empty and lightly rinse the dirty water tank
- Weekly: rinse both water tanks and wipe the tray
- Monthly: clean filters and inspect air channels
- Every 3–6 months: full deep clean
Small, frequent cleanups prevent heavy buildup that kills performance over time. Instead of dealing with thick sludge, you’re just maintaining a clean system. Less effort. Better results.
3.2 Best Cleaning Tools and Solutions (What to Use—and Avoid)
Recommended Tools
- Microfiber cloths (for sensors)
- Soft toothbrushes (for corners)
- Bottle brushes (for tanks)
- Mild dish soap + warm water
Avoid These
- Harsh chemicals or bleach
- Abrasive scrubbers
- Pouring water directly into the base
Think of your base station like a mix between a vacuum and a coffee machine. Gentle cleaning works best. Aggressive cleaning causes long-term damage.
3.3 Preventing Mold, Odors, and Bacteria in Water Tanks
Let’s be blunt: odors are almost always user-created. The biggest mistake? Letting dirty water sit. Warm, stagnant water is the perfect environment for bacteria and biofilm.
Because here’s the catch: by the time you see buildup, it’s already well established. Good maintenance keeps everything invisible. No slime. No smell. No surprises. And that’s the real goal—your robot vacuum should feel effortless again.
4. Troubleshooting Common Problems (And How Deep Cleaning Fixes Them)
4.1 Why Your Base Station Smells (and How to Eliminate Odors)
Let’s be honest—nothing ruins that “smart home” vibe faster than a sour, swampy smell coming from your robot’s base.
That odor doesn’t come out of nowhere. It’s usually the result of biofilm and stagnant dirty water building up inside the tank, tray, and hidden corners. When dirty water sits too long, bacteria multiply fast, forming that slimy layer you felt during cleaning. And once it’s there? A quick rinse won’t fix it.
The fix is deeper.
You need to:
- Fully empty the dirty tank promptly after use
- Scrub (not just rinse) the tank walls, seals, and lid
- Clean the wash tray and drain areas where residue collects
According to maintenance consensus, leaving dirty water sitting beyond a short window dramatically increases odor risk, especially in warm environments.
The moment you remove that biofilm layer, the smell disappears almost instantly. No fragrance needed. Just actual cleanliness.
4.2 Dirty Water Not Draining or Drain Errors
Few things are more annoying than a “drain error” when your robot is supposed to be doing everything for you.
You run a cycle… and the dirty water just sits there. Or worse, it backs up.
This usually isn’t a mechanical failure—it’s a blockage problem.
Inside your base station, water flows through:
- Drain holes in the tray
- Narrow tubing or channels
- Small filters or strainers
And guess what loves to clog those tight spaces? Hair, lint, sludge, and soap residue. Even a partial blockage can slow drainage enough to trigger errors. In fact, troubleshooting guidance consistently points to clogged drain holes, tubes, or filters as the primary cause of drainage issues.
Here’s how deep cleaning fixes it:
- Remove and scrub the wash tray thoroughly
- Clear every drain hole (use a brush or cotton swab)
- Clean or rinse any filters in the water path
- Check that tanks are properly seated and sealed
Clear path = smooth drainage. Simple, but easy to overlook.
4.3 Weak Suction or Poor Cleaning Performance
If your robot suddenly feels… lazy—leaving debris behind, struggling to empty itself—it’s not losing power. It’s being choked.
Suction problems almost always trace back to airflow restrictions:
- A full dust bag
- Clogged filters
- Dust buildup in internal air channels
Over time, fine particles coat the inside of ducts and filters. You won’t see a dramatic blockage—but airflow quietly drops. And when airflow drops, performance follows. This lines up with broader maintenance findings: accumulated debris in vacuum systems reduces airflow efficiency and cleaning effectiveness, even if the motor is working normally.
The fix is straightforward:
- Replace or empty the dust bag before it’s overfilled
- Clean or rinse filters (if allowed) and fully dry them
- Brush or vacuum dust from intake ports and air channels
- Wipe seals to ensure proper suction alignment
Once airflow is restored, the difference is immediate. Stronger emptying. Cleaner floors. Less noise strain.
5. Advanced Deep Cleaning: Tubing, Descaling, and Hidden System Areas
5.1 How to Flush Internal Tubing and Water Lines
Here’s where most guides stop—and where long-term problems actually begin.
Even if your tanks and tray look spotless, the real buildup often hides inside the tubing and pump system. These narrow pathways quietly collect residue over time, restricting water flow and creating hidden odor sources.
The fix? A controlled flush.
A widely recommended method is to run soapy water through the system, followed by a clean water rinse, which helps break down internal residue and biofilm. In practice, that means:
- Fill the clean water tank with warm water + a small amount of mild detergent
- Run a wash cycle to circulate it through internal lines
- Follow with multiple clean water cycles to rinse everything out
According to system-cleaning workflows, a short soapy flush followed by a longer clean-water rinse is highly effective at clearing internal buildup.
If your model allows access:
- Use pipe brushes to clean tubing ends
- Rinse thoroughly before reconnecting
This step alone can restore proper water flow—and eliminate those “mystery smells” that keep coming back.
5.2 Descaling for Hard Water: When and How to Do It Safely
If you live in a hard water area, there’s another invisible enemy: mineral scale.
You might notice:
- Slower water flow
- Chalky residue in tanks
- Slightly noisier pump operation
That’s scale building up inside your system. Left unchecked, it narrows water channels and strains the pump—just like limescale in a coffee machine.
The key here is restraint. Strong acids or high concentrations can damage seals and plastics. Gentle, controlled descaling is what restores performance safely. Do it periodically—not aggressively.
5.3 Hygiene Optimization Tips Most Guides Miss
This is where you go from “clean enough” to truly hands-free.
Most people clean reactively—after smells or clogs appear. But the real upgrade comes from preventing problems before they start.
A few small habits make a huge difference:
- Use filtered water when possible to reduce mineral buildup
- Leave tanks open after cleaning so they fully air-dry
- Avoid letting water sit unused for days
- Run occasional full-system flush cycles, even if things seem fine
Why does this matter? Because modern base stations are closed-loop systems—they constantly recycle water, airflow, and debris. Any contamination inside doesn’t just stay there—it spreads.
One overlooked trick from system maintenance practices: Occasionally letting the system fully dry (no standing water anywhere) dramatically reduces long-term bacterial growth. No moisture = no biofilm.
6. Conclusion
A self-emptying base station is supposed to save you time—not create new chores. But without proper deep cleaning, it quietly turns into a source of odors, clogs, and weak performance.
The fix isn’t complicated. It’s consistent.
By fully cleaning both the dry and wet systems, flushing hidden tubing, and letting everything dry properly, you reset your machine back to what it was meant to be: effortless.
Clean system. Strong performance. Zero surprises. That’s what “hands-free” is actually supposed to feel like.
FAQ
Q: How often should I deep clean my robot vacuum's base station?
A: For optimal performance and hygiene, a full deep clean is recommended every 3 to 6 months. However, you should rinse the dirty water tank after every use and wipe down the wash tray weekly to prevent biofilm buildup and unpleasant odors from developing.
Q: Why does my base station smell even after a quick rinse?
A: Odors are primarily caused by biofilm, a slimy layer of bacteria that clings to tank walls and seals. A simple rinse cannot remove this layer; you must physically scrub the interior surfaces with a brush and mild detergent to eliminate the source of the smell completely.
Q: Can I use bleach to clean the water tanks?
A: It is generally advised to avoid harsh chemicals like bleach, as they can degrade plastic components and damage internal seals over time. Instead, use warm water with a mild dish soap or a manufacturer-approved cleaning solution to safely maintain the integrity of your station.
Q: What should I do if my base station is not draining properly?
A: Drainage issues are usually caused by clogs in the wash tray, filters, or internal tubing. Check for hair and debris in the drain holes, ensure the water tanks are seated correctly, and perform a soapy water flush to clear any internal residue obstructing the lines.
Q: How long should I let components dry after cleaning?
A: To prevent mold and bacterial growth, filters should air-dry for at least 24 hours. Water tanks and wash trays should be left open to dry for 24 to 48 hours before reassembly. Never reinstall damp components into the base station.